11.24.2009
Its been several months since our last posting. After the car show we took a break to get caught up with other areas of our lives that got put on hold while we pushed to make our dead line - but what progress we made!
The next part of the restoration project was one that I had been putting off since I had no experience at it, and have been told its one of the most challenging parts of the job -- rebuilding the convertible top.

We were at a bit of a disadvantage as all we had was a rusty frame to go by - as you can see above - so it was time to research and try to gain wisdom from others who have been down this path. Fortunately, there are many VW guys out there willing to share what they have learned.
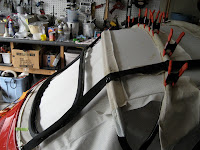
We began by sanding down the old frame, prepping it, and then giving it a gloss coat of POR-15. The other part of the frame holds the rear window, and at the top of the page you can see Stephen helping to glue a new rubber gasket once it had been sanded and repainted. In hindsight, I wish we had replaced it, for over the past 39 years, it has been stretched enough to make this even more challenging.
Here we first add the headliner, glue it to the frame bows, and then cover it with black foam padding for both insulation and sound deadening.
The hardest part of this part of the project was making the first cut!


Since the vinyl top had been stapled to the window frame gasket, it stayed in place as we finished the job.


Because of the stretched rear window frame we had to shim it a bit and seal it up tight, but the results seem to work well. Here's a shim sample, the interior with the glass in, and a pic from the back - looking good!
Thanks for following along on our restoration journey!


1 comment:
looks great!
Post a Comment